
Migrating a website from one hosting provider to another without downtime is often described as the ideal scenario. In reality, true zero downtime is rare, especially for dynamic or transaction‑heavy websites. However, with the correct planning and execution, downtime can be reduced to a point where most users never notice the migration at all.
The amount of downtime during a migration depends on several factors, including the type of website, traffic patterns, DNS configuration, and how data is handled during the transfer. A simple blog or static website can often be migrated with effectively zero downtime. An e‑commerce store or any site with frequent database writes requires additional precautions to avoid data loss.
This guide explains a manual, step‑by‑step approach to migrating a website while minimizing downtime as much as possible. Each step is designed to be practical, guided, and technically sound, even for complex hosting environments.
The migration process consists of temporarily stopping or limiting site activity, creating a full backup of all files and databases, uploading that backup to the new hosting environment, restoring it with the hosting control panel, updating DNS or nameserver records to point the domain to the new server, and finally taking the site out of maintenance mode and verifying that all pages, data, and dynamic functions are working correctly.
Step Zero – Stop or Limit Site Activity
This step is critical for websites with dynamic or user‑generated data, such as online shops, membership systems, forums, or booking platforms. The goal is to ensure that no data changes occur during the migration window.
A common and effective strategy is to perform the migration during off‑peak hours. For a local website, this is often late at night or early morning. While it is rarely guaranteed that no users will be active, traffic is typically minimal during these periods.
For globally accessible websites or high‑traffic platforms, relying on low‑traffic hours alone is risky. In these cases, enabling maintenance mode is strongly recommended. Maintenance mode should: – Disable purchases, registrations, and form submissions – Prevent database writes – Display a clear message informing users that the site is temporarily unavailable
Static sections such as blog posts or informational pages may remain accessible if they do not change during this time. Any area where users can modify data must be disabled. Failing to do so can result in partial data migration, leading to missing orders, user records, or content with no reliable way to identify what was lost.
Step 1 – Create a Full Backup
Once you are confident that no further changes will occur on the website, the next step is creating a complete backup. This backup must include: – Website files – Databases – Email accounts (if applicable) – Domain configuration and settings.
Most hosting providers offer built‑in backup tools through their control panels. If the site was developed or hosted locally, backups must be created manually using tools such as mysqldump, FTP/SFTP, or SSH.
For automated restoration compatibility, the recommended format is .tar.gz, as it is widely supported by hosting panels and restoration tools such as DirectAdmin. Using a single compressed archive reduces the risk of missing files and simplifies the restore process.
If your backup is in a different format, you may need to convert it or perform a manual restore later. In some environments, hosting support staff may assist with non‑standard backup formats.
Step 2 – Upload the Backup to the New Host
After creating the backup file, it must be uploaded to the new hosting environment. This can usually be done through the hosting control panel’s File Manager or via FTP.
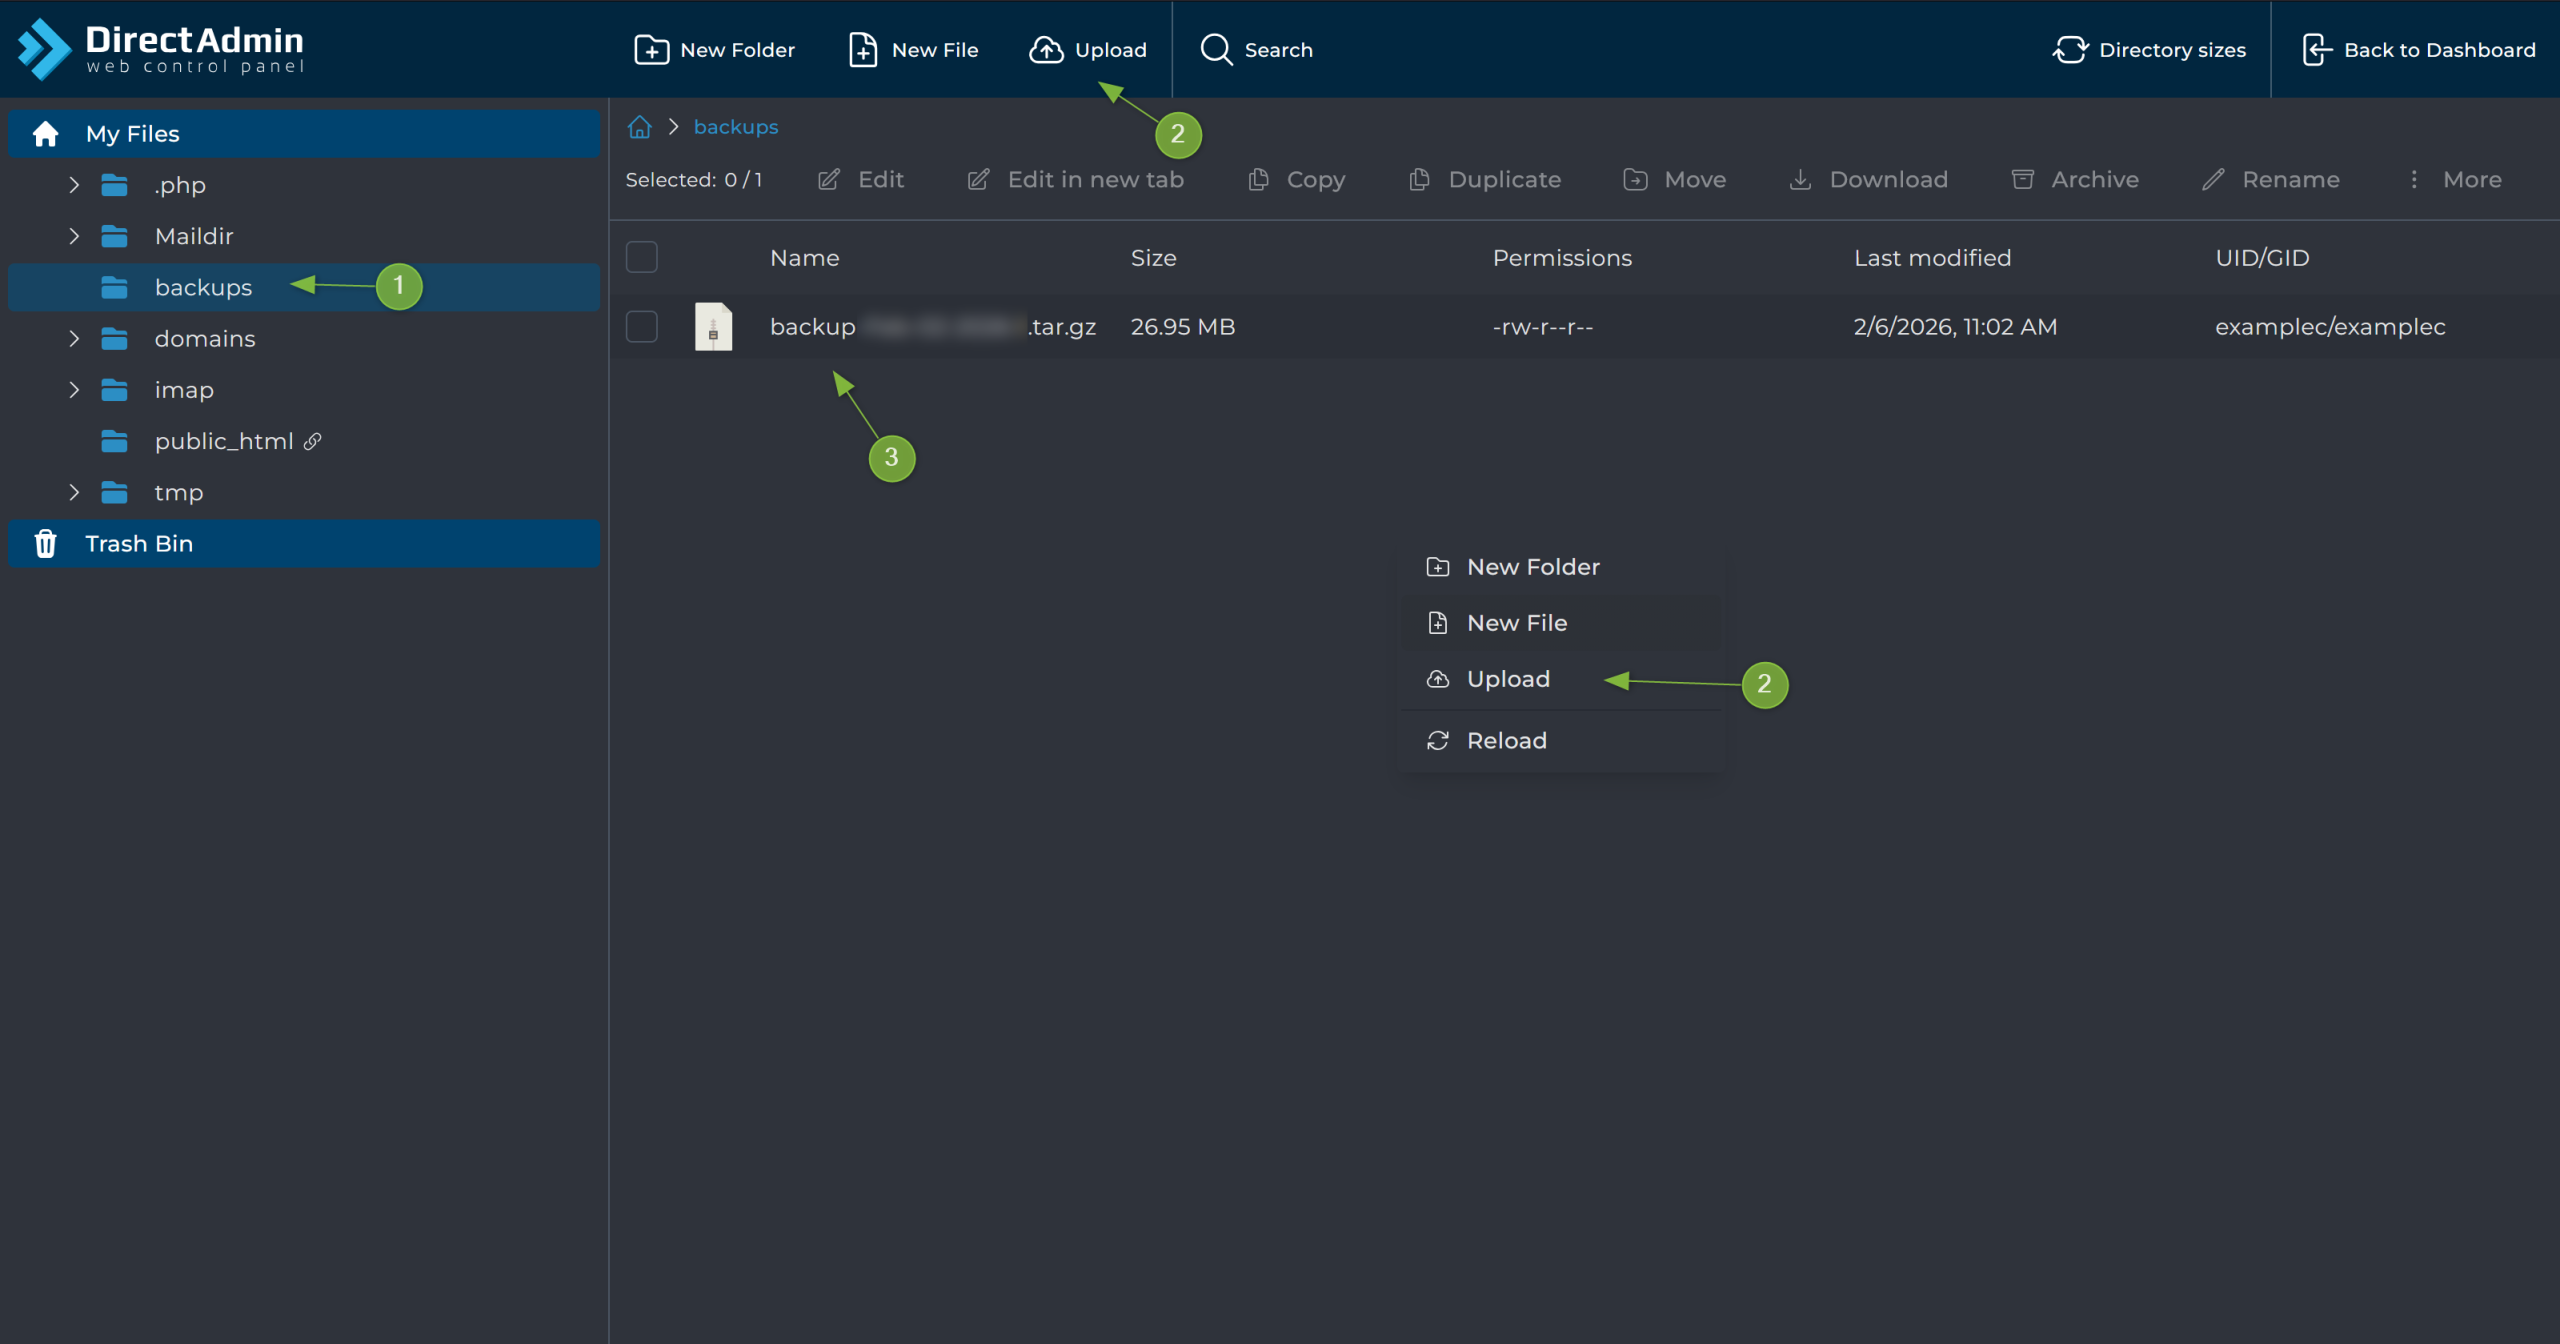
Using the File Manager, navigate to the following path: 1. Select the correct domain 2. Enter the domain’s root directory 3. Locate or create a directory named backups.
The directory name must be exactly backups (all lowercase) for the control panel to detect the backup automatically. Inside this directory, upload the .tar.gz backup file using the upload button or the right‑click menu.
Alternatively, you can use AXFilePro, a file manager available in AXSpace.com. This tool functions similarly to the standard a file manager and can be used to upload the backup to the same directory.
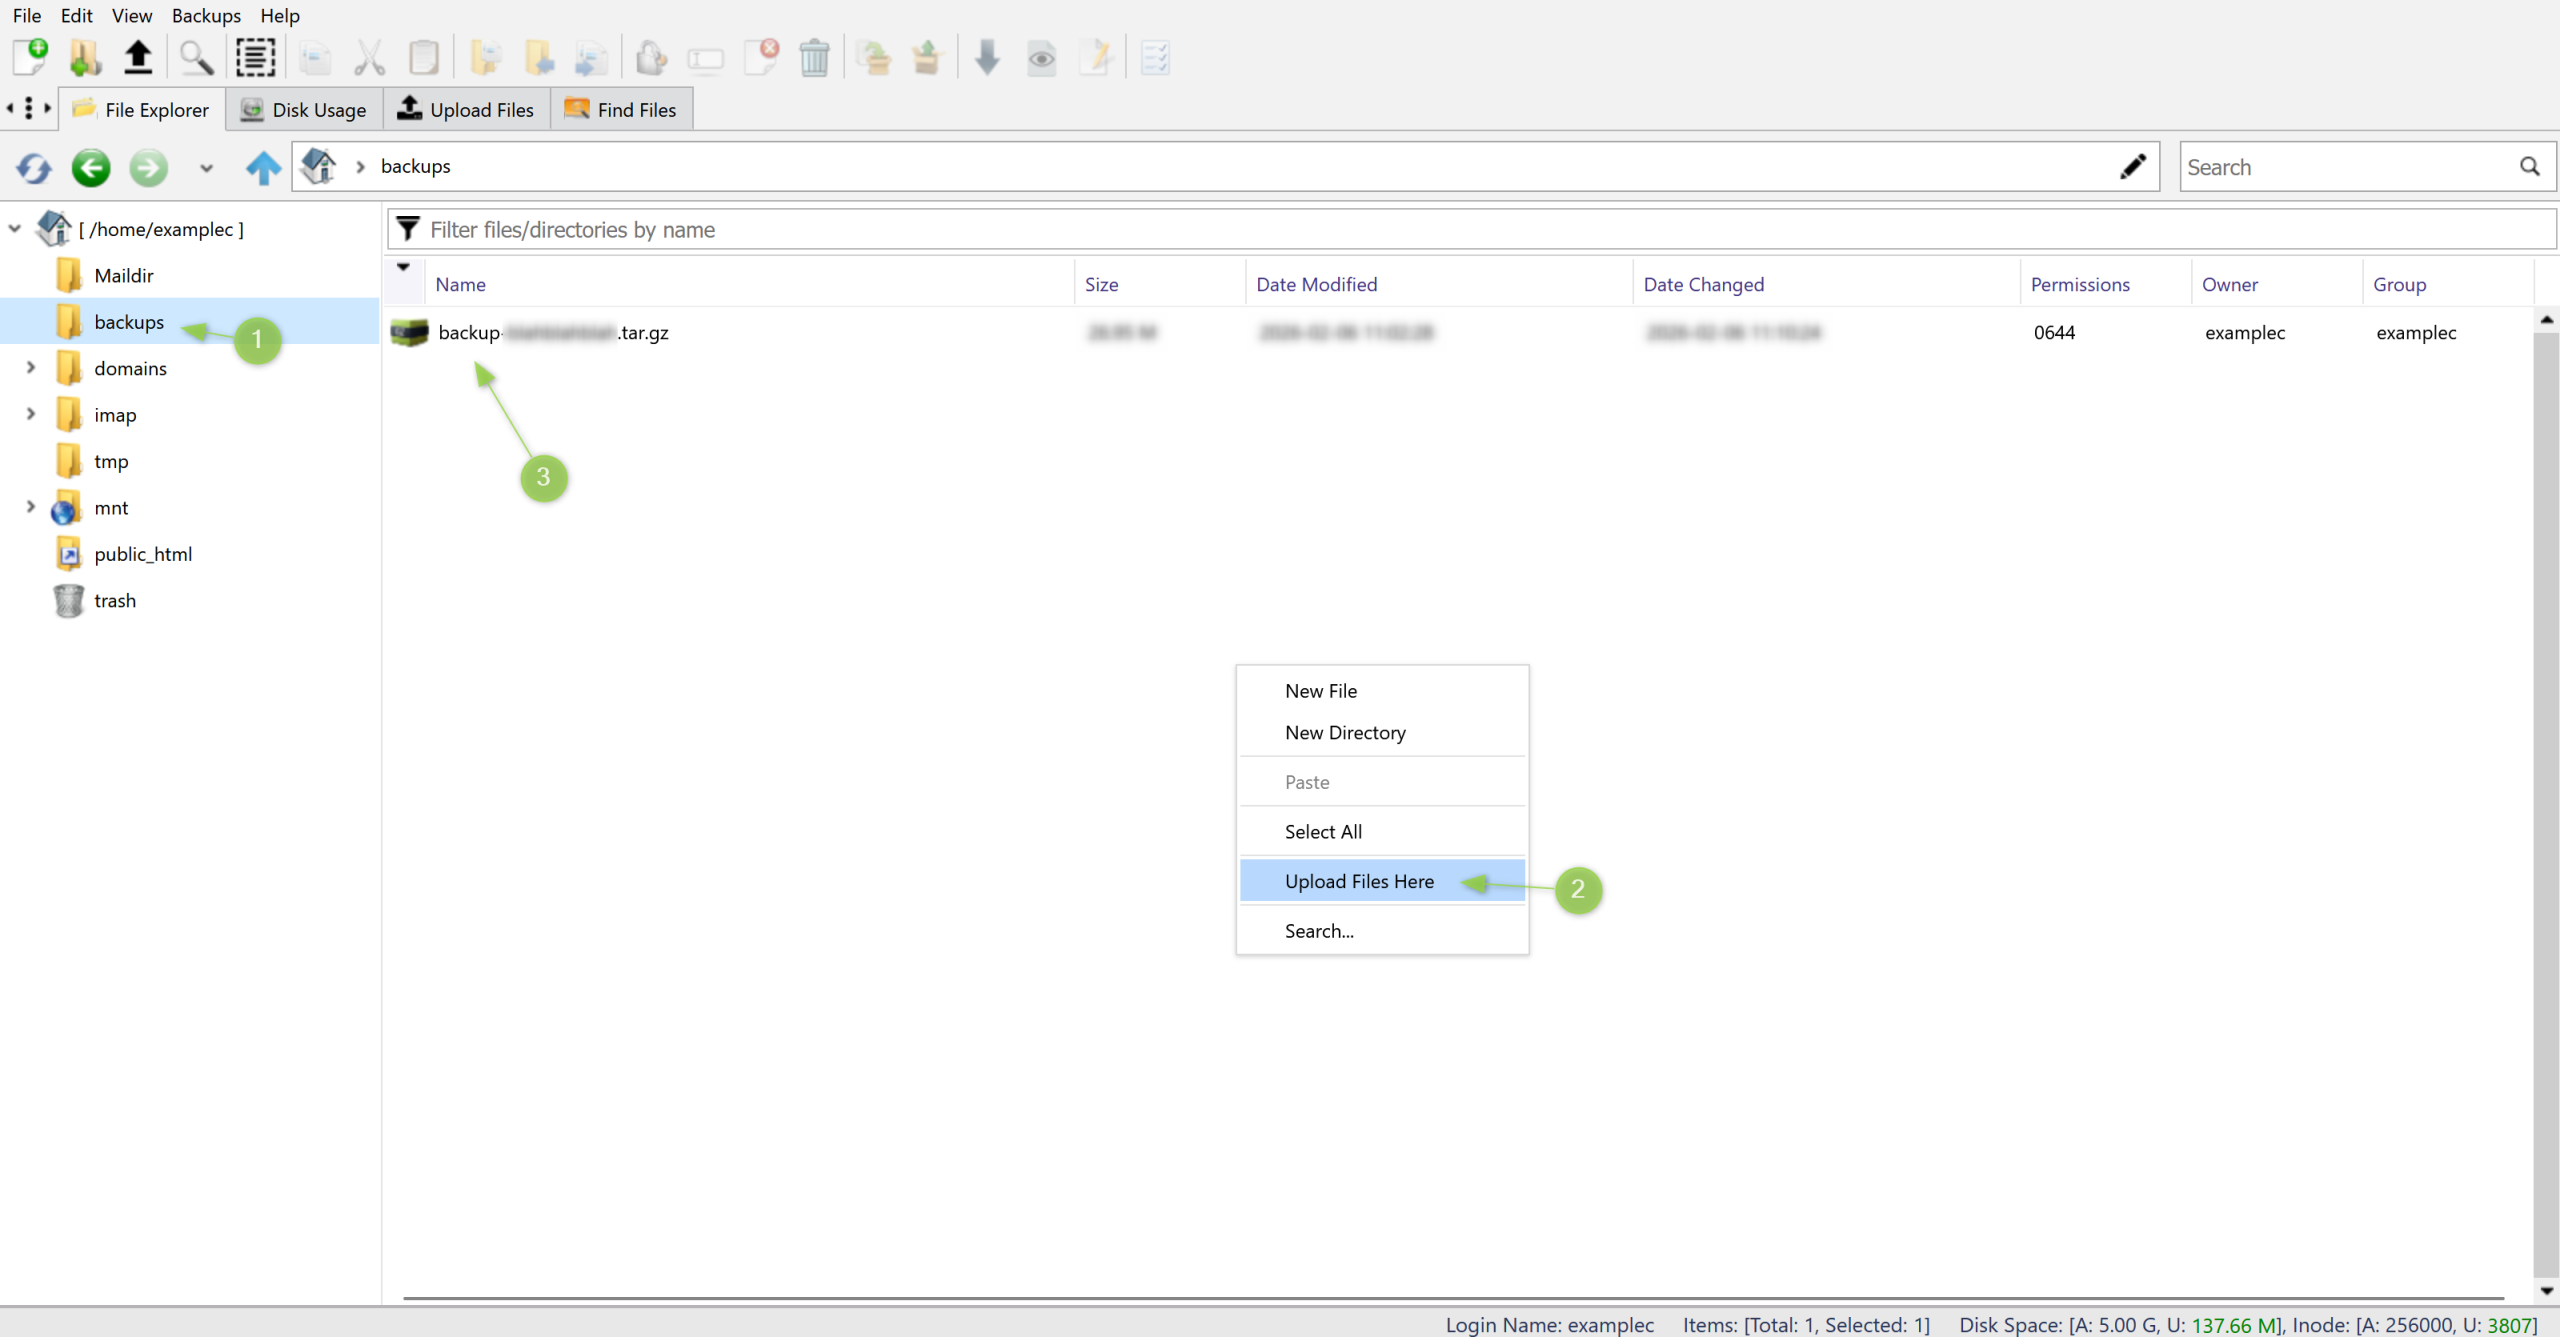
Two technical requirements must be met at this stage: 1. The backup file must be placed in the correct directory 2. The file must be in .tar.gz format
If either condition is not met, the automated restore process will fail or the backup will not appear as an available restore option.
Step 3 – Restore the Backup
Before initiating the restore process, verify that your hosting account has sufficient resources available. This includes: – Disk space – Available databases – Database users – Inode limits (if applicable).
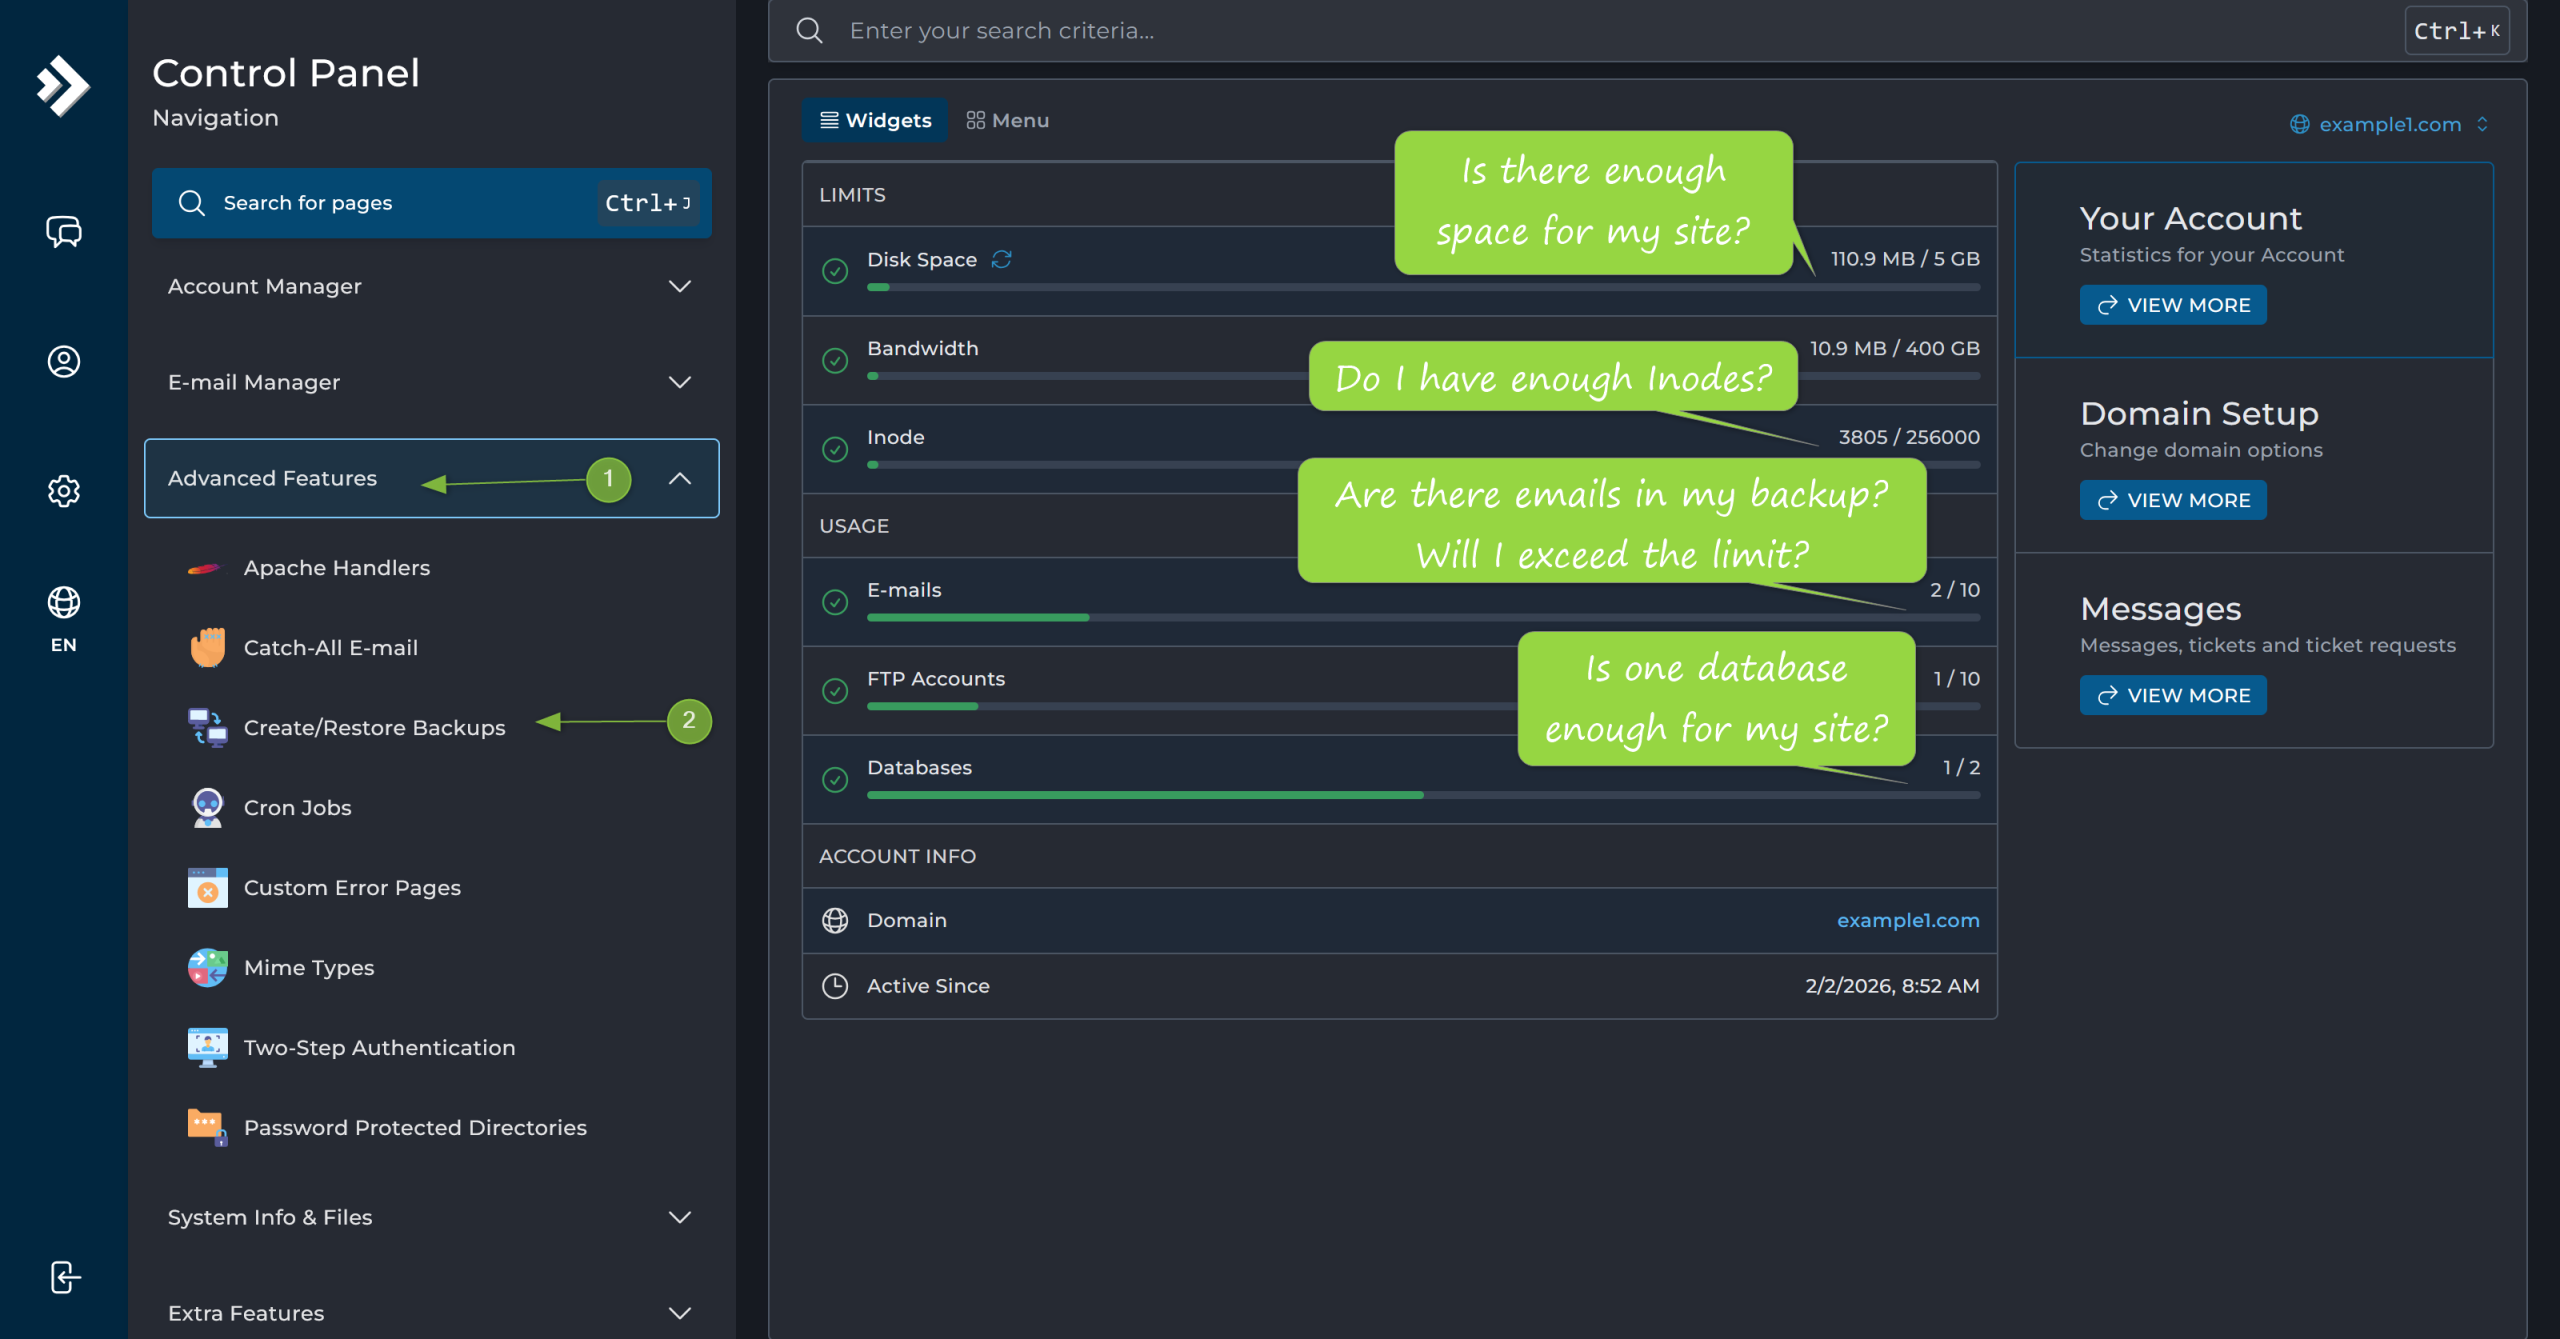
Insufficient resources can cause partial restores or unexpected errors. It is best to confirm these limits beforehand rather than troubleshooting after a failed restore.
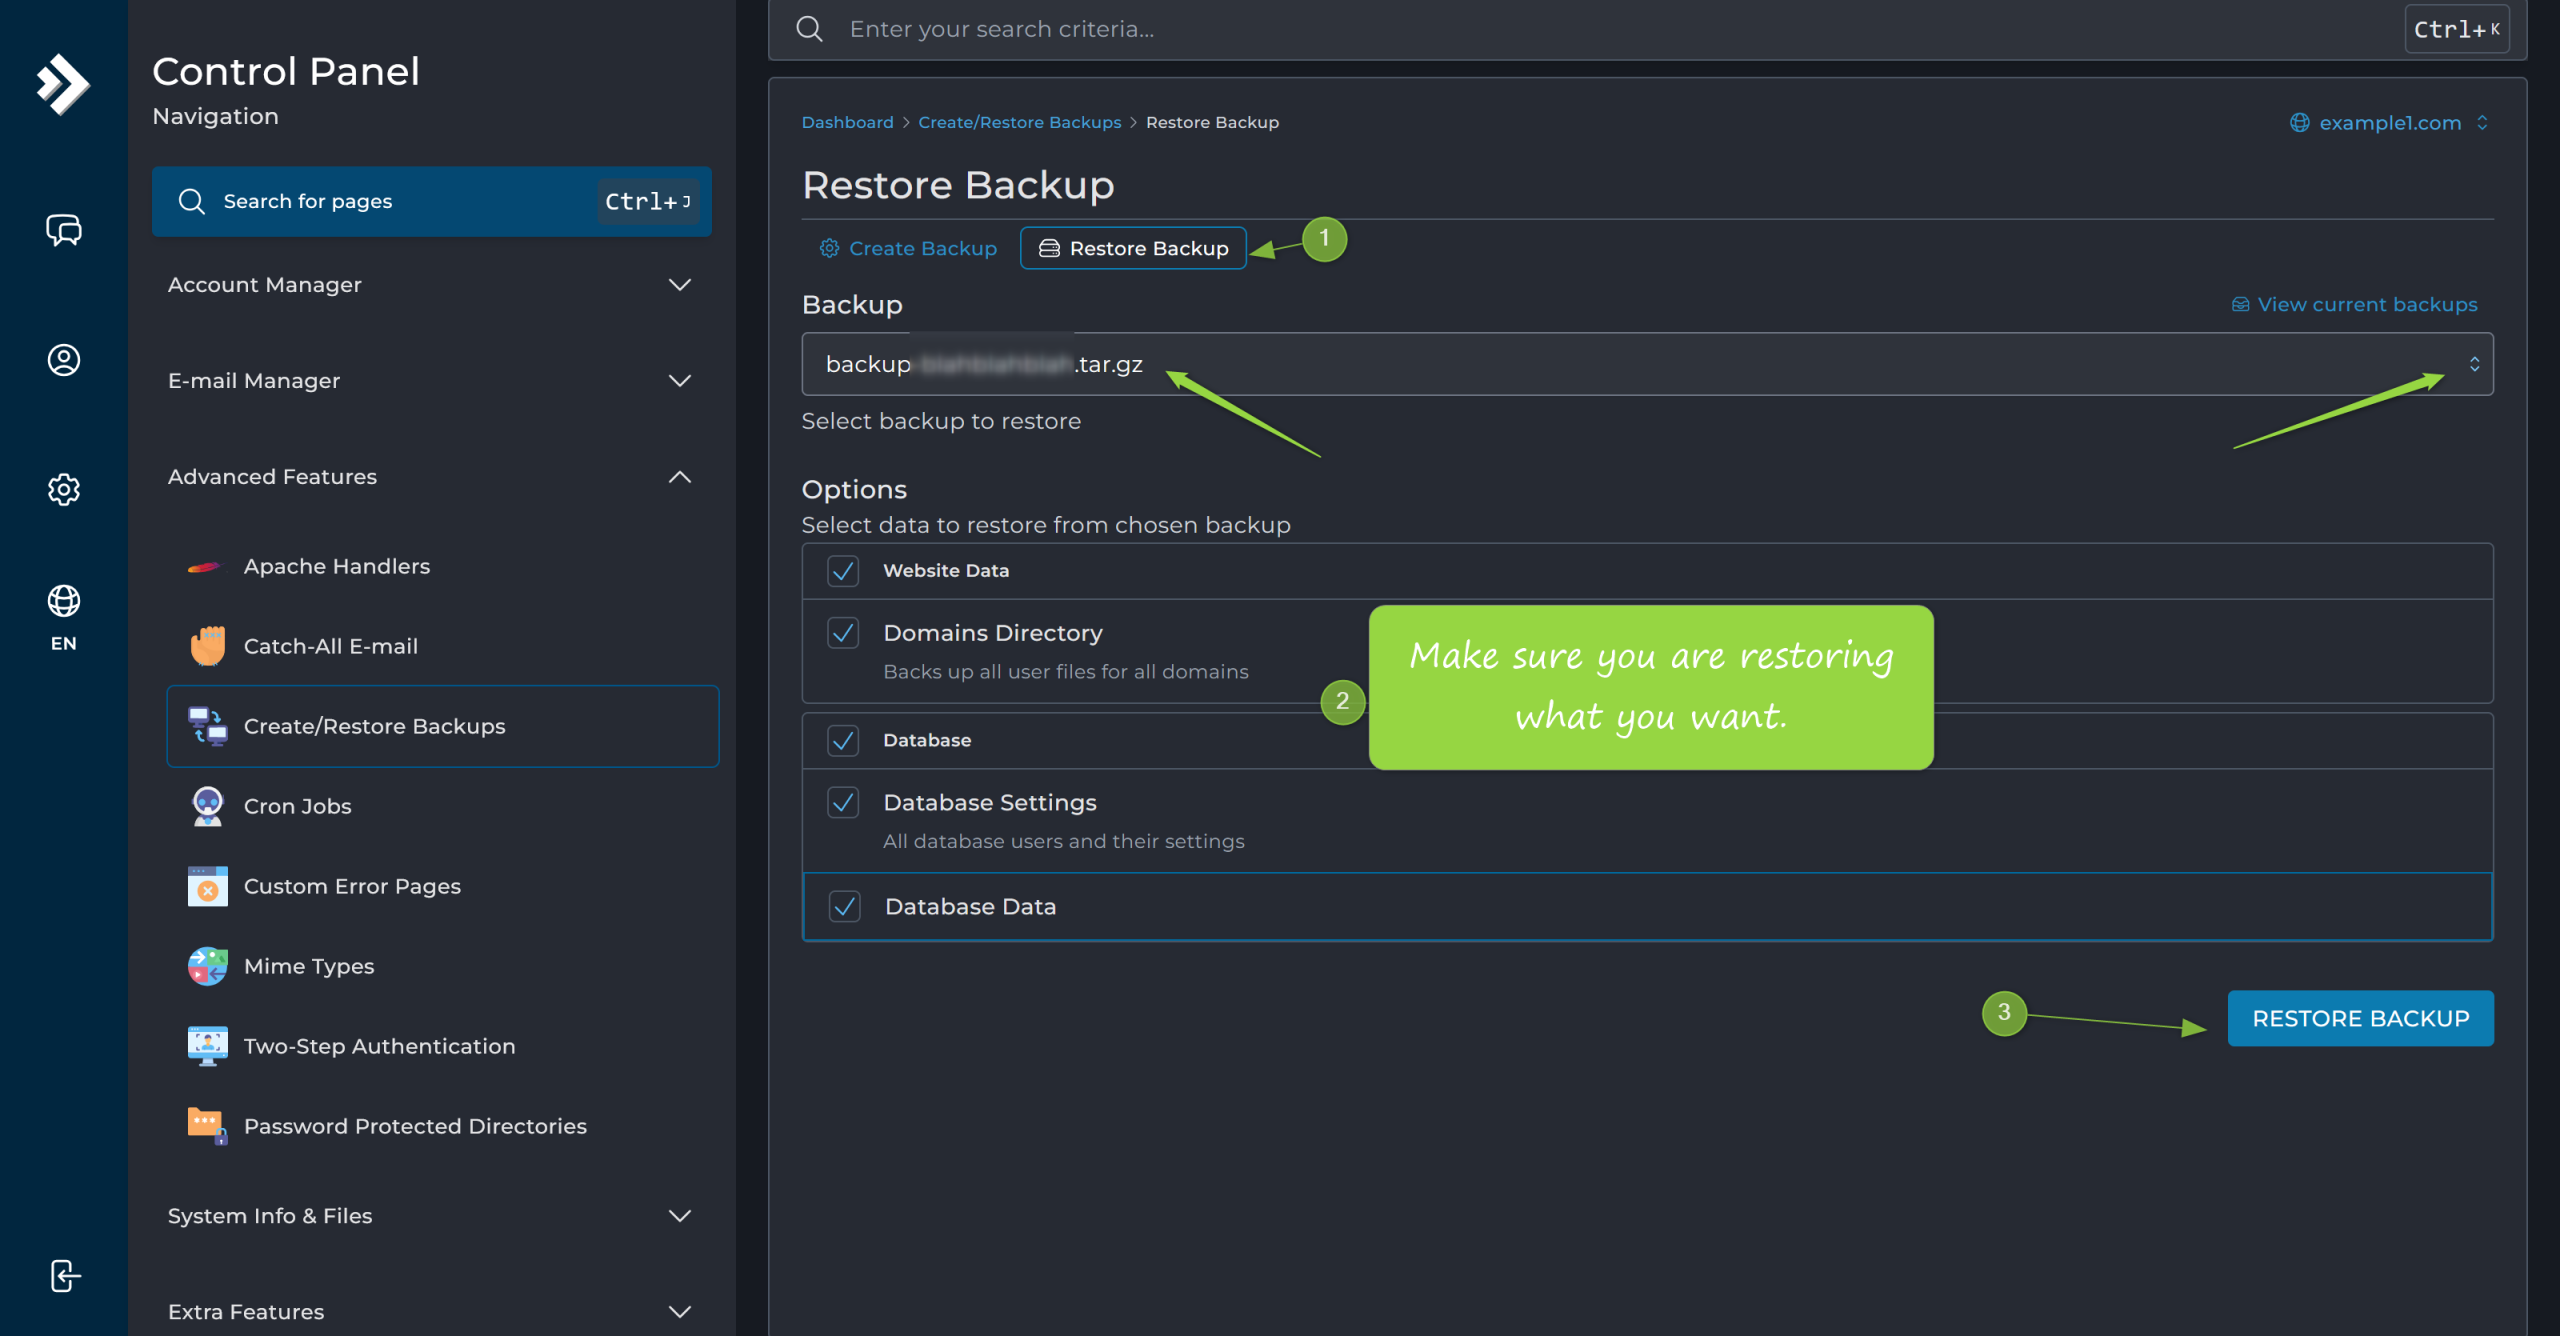
To restore the backup, navigate to Create/Restore Backups under the Advanced Features section of your hosting control panel. Select the restore option, choose the uploaded backup file, and mark all relevant data types for restoration.
During the restore process, the control panel will automatically: – Configure the domain – Create required databases – Restore files to their correct locations – Apply settings from the backup.
If the backup is a full hosting backup, the entire site structure will be recreated without manual intervention. Depending on the size of the site, this process may take several minutes.
Step 4 – Change Nameservers or Update DNS Records
Once the site is fully restored and verified on the new host, it is time to point the domain to the new server. This is usually done by updating the nameservers at the domain registrar.
AXSpace.com uses name servers that look like this:
ns.axspace.com
ns2.axspace.com
After updating the nameservers, DNS propagation begins. While propagation can take up to 24 hours globally, most users will see the new server within minutes to a few hours.
If your domain is using a CDN or external DNS provider, changing nameservers may not be necessary. In such cases, you only need to update the origin or service IP address within the CDN or DNS management panel. This approach often results in even less noticeable downtime.
Step 5 – Test and Go Live
Once DNS changes are in effect, disable maintenance mode and bring the site fully online. At this stage, thorough testing is essential. Verify: – Page loading and navigation – Forms and user interactions – Database‑driven features – Login systems – Payment or checkout processes.
It is also recommended to monitor server logs and error reports during the first hours after launch. Early detection of issues allows for quick corrections before users are significantly affected.
Final Considerations and Best Practices
For websites with no dynamic data, maintenance mode may not be required at all. Static websites can often be migrated with no visible downtime by restoring the site on the new host and updating DNS afterward.
Dynamic websites can also be migrated without maintenance mode, but this carries risk. Any data changes made during the migration window must be manually reconciled. This approach should only be used when data loss is acceptable or when additional synchronization mechanisms are in place.
A successful near‑zero downtime migration is less about speed and more about preparation. Careful planning, verified backups, and controlled activity during the migration window are what make the process reliable and predictable.
When executed correctly, most users will never realize that a migration took place.