
DKIM, SPF, and DMARC are some of the most important DNS records you need to set up on your mail server. They help make sure the emails you send have the best chance of landing in your recipients’ Inbox instead of the Spam folder.
Many people who plan email marketing campaigns spend hours preparing a big promotion or festival email, only to find out later that most of their messages never even reached the Inbox; they went straight to Spam!
This is one of the most common problems every company or team faces at least once. When a large number of your emails fail to reach the Inbox, you end up with serious issues like:
- Higher Spam Rate
- Lower Sender Reputation (your domain and IP start looking untrustworthy to email providers like Gmail, Outlook, Yahoo, etc.)
The result? You run a campaign hoping to grow your business, but instead of getting sales or sign-ups, you damage your email deliverability and create new headaches that take time and effort to fix.
Before we get into how to set up these records, let’s first see exactly what these records do.
What is the SPF Record and What Does It Do?
The SPF record (Sender Policy Framework) is one of the key DNS records for email sending. It tells email providers which servers are officially allowed to send emails from your domain.
Without SPF:
- You can send emails from any server, but most email services (Gmail, Outlook, Yahoo, etc.) won’t trust them.
- Your messages usually end up in the Spam folder — even if the content is perfectly legitimate.
When you add an SPF record to your domain’s DNS zone:
- You list the authorized servers (e.g., your hosting server’s IP, or include:_spf.axspace.com for AxSpace).
- Email receivers check this list. If the sending server matches, your email gets a big trust boost → much higher chance of landing in the Inbox.
- If the server doesn’t match, the email is marked suspicious or rejected.
- It helps stop spoofing (someone faking your domain to send spam or phishing emails).
- Only servers you approve can use your domain in the “From” address.
There can be only one SPF record per domain, even if you use multiple mail servers. You combine them all into a single record (e.g., include several IPs or includes).
What is the DKIM Record and What Does It Do?
The DKIM record (DomainKeys Identified Mail) is another essential standard for getting your sent emails into users’ Inbox folders instead of Spam. It works similarly to the SPF record and helps prevent fake emails by detecting forged or tampered messages, reducing spam, email interception, and other threats.
DKIM adds a digital signature to the header of every email your server sends. When the email is sent, the server creates this signature; when the recipient’s email client (such as Gmail) receives it, the client verifies the signature against your public key in DNS. If the signature matches on both sides, it proves the email content was not modified by anyone after you sent it.
Like SPF, only one DKIM record can be defined for a domain (even across multiple servers; you can use different selectors if needed).
DMARC Rules and Conditions
DMARC (Domain-based Message Authentication, Reporting & Conformance) is a DNS record that tells the receiving email server exactly what to do with emails from your domain that fail proper authentication.
It instructs the receiver: If an email doesn’t pass SPF or DKIM checks correctly (or both), should we deliver it normally, quarantine it (send to spam/junk), or reject/block it completely?
Emails can fail authentication for several reasons, such as:
- No SPF or DKIM records set up on your sending server
- SPF or DKIM records exist but are set up incorrectly
- The sending server’s IP isn’t listed in your SPF record
- DKIM signature is missing, invalid, or doesn’t match
- The “From” domain doesn’t align with the SPF/DKIM results (alignment failure)
When these failures happen, the receiving server (Gmail, Outlook, etc.) may:
- Block the email entirely
- Quarantine it (put in spam folder)
- Or deliver it normally — depending on your DMARC policy (p= tag)
DMARC helps protect your domain from spoofing and phishing while giving you control over how unverified emails are handled. It also sends you reports so you can spot and fix issues early.
In short: DMARC doesn’t send emails — it protects your reputation by guiding receivers on how to treat suspicious messages claiming to be from you. Start with a relaxed policy (p=none) to monitor, then tighten it to quarantine or reject once everything is working correctly.
How to Set Up DKIM, SPF, and DMARC Records
In the first step, we should mention that after purchasing any hosting service from AxSpace, the SPF and DKIM records are automatically created for you. So, you don’t need to do anything!
However, if for any reason you cannot see the SPF record for your domain in the DNS Management section of your DirectAdmin panel, you can use the steps described below.
To set up the DKIM, SPF, and DMARC records for your domain, follow the order recommended by Google for best results. We’ve listed the step-by-step sequence below for your convenience:
- First, set up the SPF record for your domain.
- Next, create the DKIM record in your domain’s DNS zone.
- Then, create a dedicated mailbox (e.g., dmarc@yourdomain.com or reports@yourdomain.com) to receive DMARC reports.
Finally, wait at least 2 days after completing the above steps before adding the DMARC record.
This delay gives time for the SPF and DKIM changes to fully propagate and for some initial data to be collected, so your DMARC policy works correctly from the start.
In the following sections, we provide a simple guide to creating each of these records in the DirectAdmin panel on AxSpace. You can follow these steps with minimal technical knowledge.
To add DKIM, SPF, and DMARC records, you need access to your domain’s DNS zone:
- Log in to your DirectAdmin control panel.
- Go to Account Manager > DNS Managment
- Select the desired domain from the top right of the panel.
- Click on ADD RECORD, Then select TXT from Record Type menu.
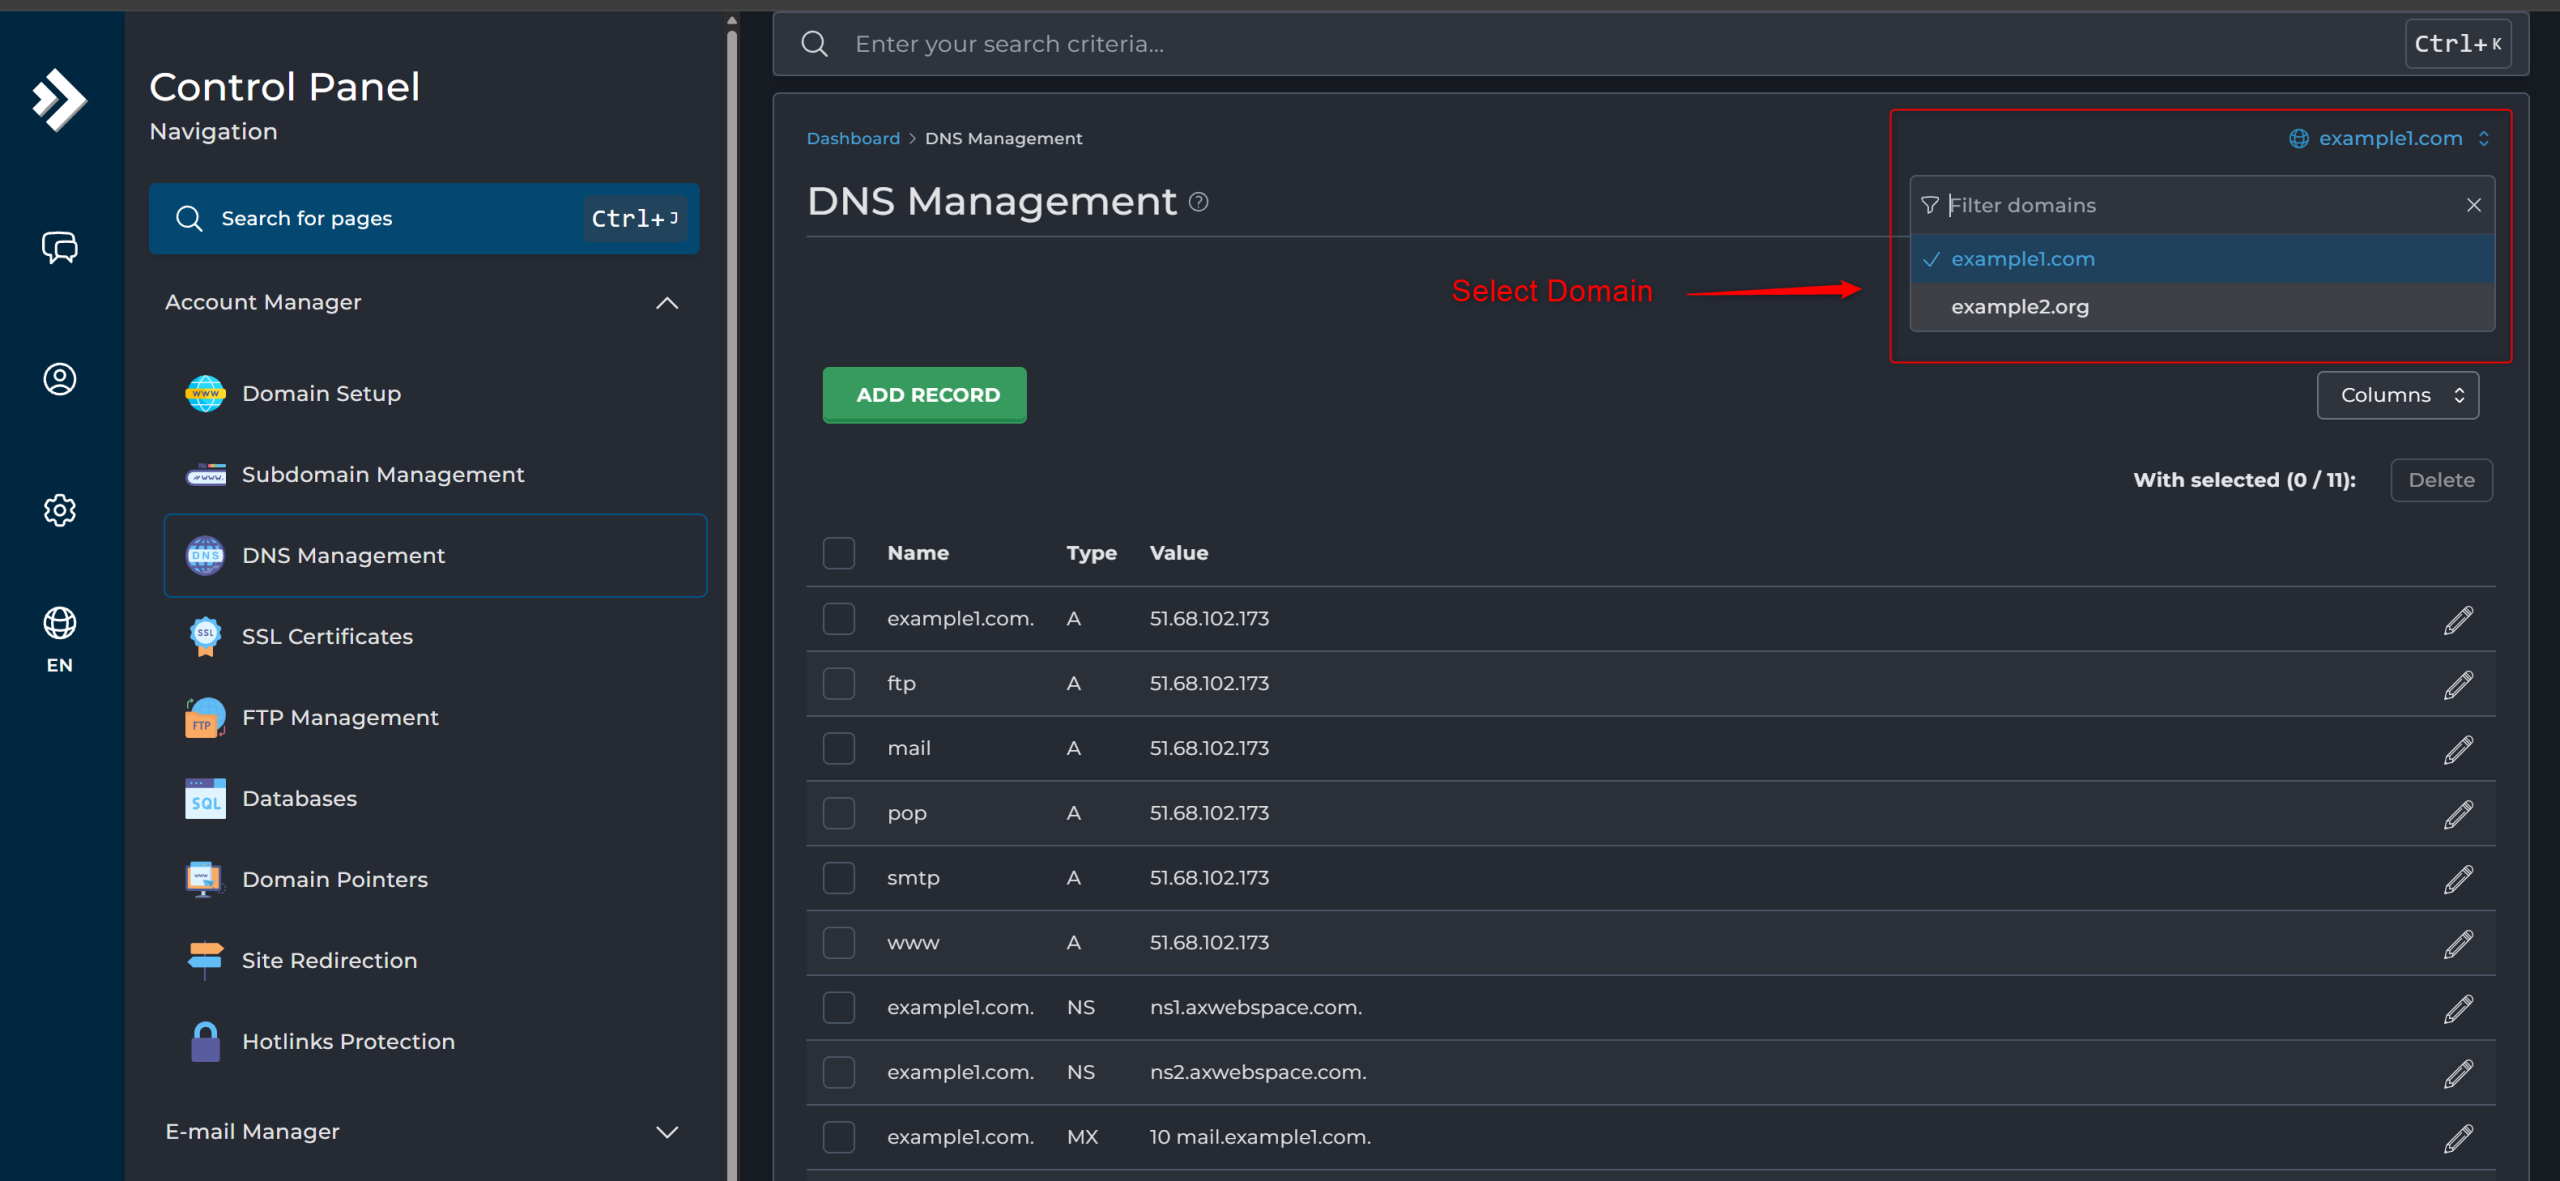
There you can add, edit, or view TXT records for SPF, DKIM, and DMARC.
To create a TXT record, you need two fields: “Name” and “Value”.
The value for “Name” is your domain name followed by a dot (.) at the end.
For example, if our sample domain is axspace.com, the value you should enter in the Name box would be:
”
axspace.com.
”
Next comes the “Value” field after “Name”.
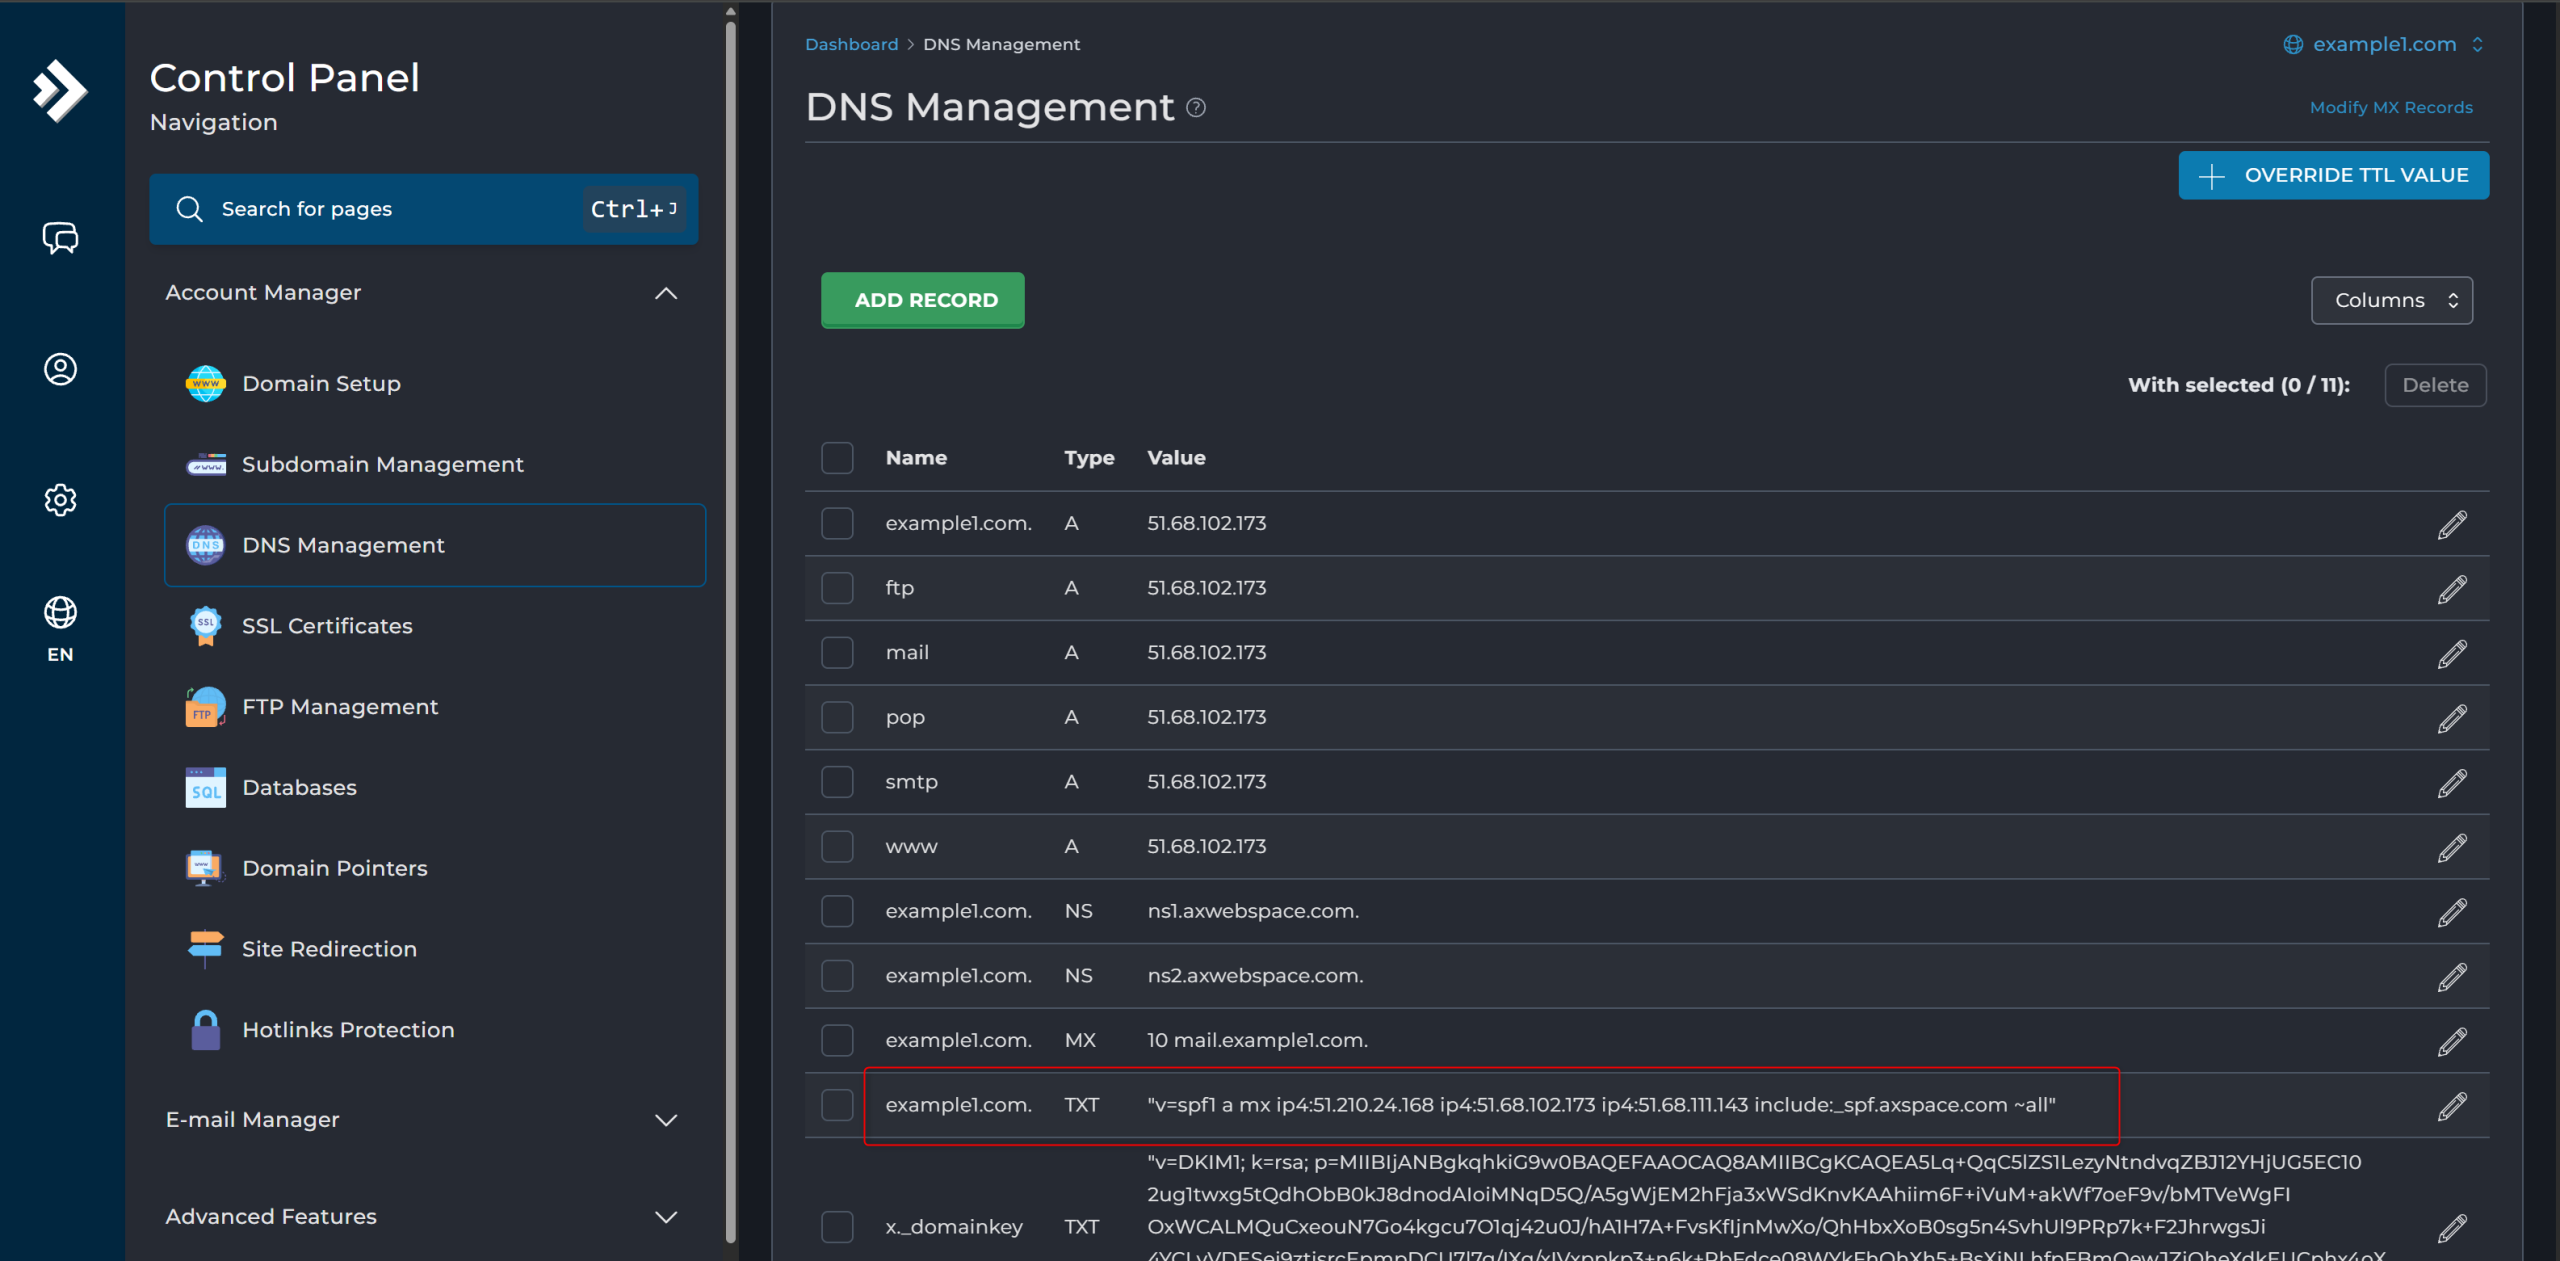
Creating SPF Record
All AxSpace users whether on all plans should use the following pattern in the Value section of their SPF record:
text
“v=spf1 a mx ip4:51.210.24.168 ip4:51.68.102.173 ip4:51.68.111.143 include:_spf.axspace.com ~all”
As you can see, the IP range highlighted in red above may vary depending on your specific service. You need to get the correct IP range for your server by opening a support ticket with the technical team.
Finally, just click the “Add” button next to the TXT record.
How to Create a DKIM Record
As mentioned earlier, when you purchase a new hosting service from AxSpace, the DKIM record is automatically created in your Domain Zone (DNS Management). So, in most cases, you don’t need to do anything.
However, if for any reason you cannot see the DKIM record in your domain’s DNS settings, the best step is to contact AxSpace support.
The “Value” part of the DKIM record is generated automatically and separately for each hosting service. Regular users do not have direct access to create or edit it manually. While advanced users with strong networking knowledge could technically set up a DKIM record themselves, it is not recommended and usually unnecessary.
The simplest and safest way is to reach out to support if the DKIM record is missing.
AxSpace users can log in to their panel, then click “this link” to open a support ticket and report the DKIM issue directly to the technical team.
How to Create a DMARC Record
At the beginning of writing this guide, we planned to explain how to manually create a DMARC record step by step. However, we discovered that many free online tools now exist to help you generate a DMARC record for your domain in less than a minute!
After checking several of these sites, we found that “easydmarc.com“ offers the most complete and user-friendly way to create a DMARC record with a very simple and attractive interface. For this reason, we decided to use this site in our guide.
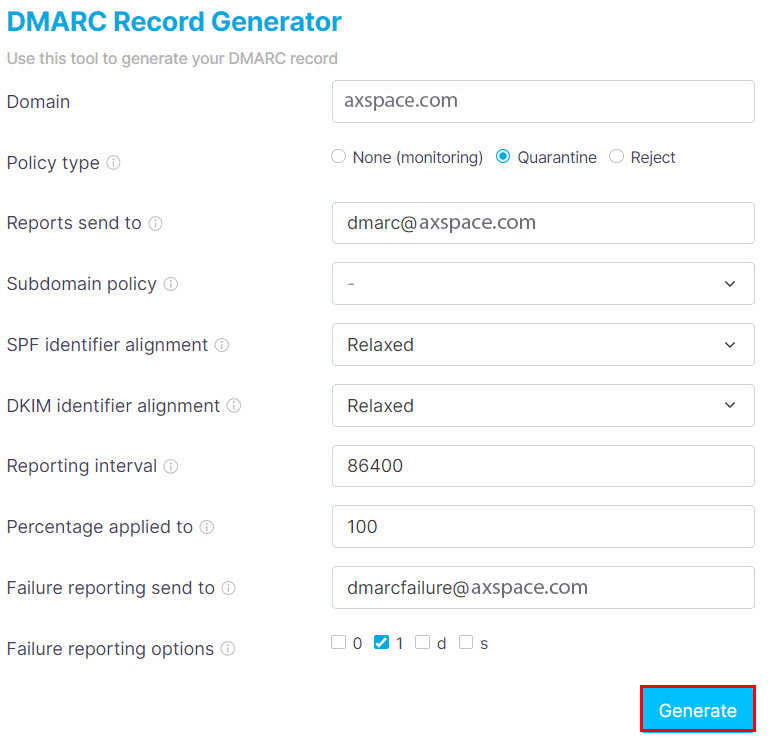
As you can see in the image above, there is a form on this page. You need to fill in the different sections according to your own policy, then click the “Generate” button at the end. This will create the Value for your DMARC record based on the settings you chose.
You can read the explanations for each section of the form below.
Domain: Enter your domain name here without any prefix (no www or https://). For example: axspace.com
Policy type: This is the most important part of the DMARC record. By choosing an option here, you decide what should happen to emails from your domain that fail authentication checks. We explained the DMARC rules and conditions in detail earlier in this guide, which can help you pick the best option for your needs.
Reports send to: Enter the email address you created earlier to receive DMARC reports. Make sure this email address uses your own domain (for example: dmarc@axspace.com or reports@axspace.com). It must end with your domain name.
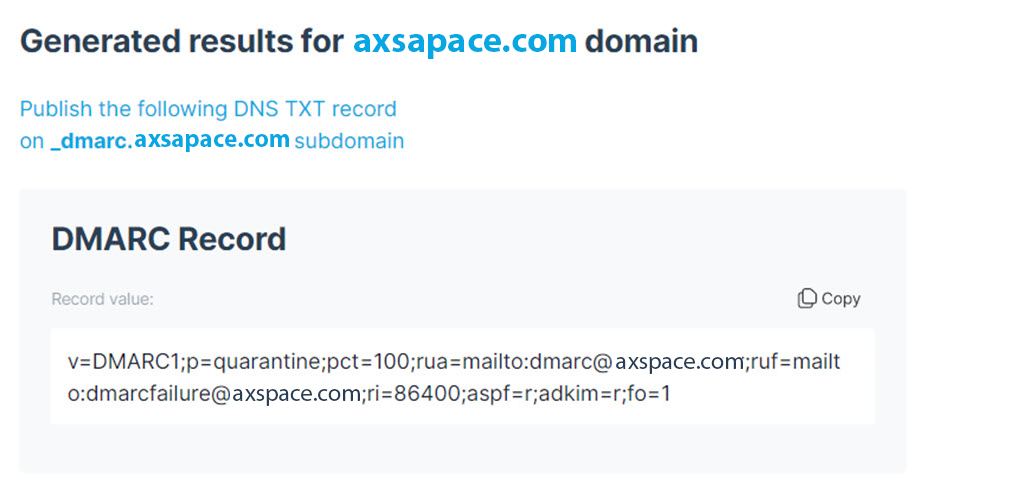
As you can see in the image above, the Easydmarc site generates two values for you: “Name” and “Value” for your DMARC record.
Just a quick reminder: DMARC is also a TXT record, so the way you add it is exactly the same as SPF and DKIM — no differences.
The only thing to pay attention to: When entering the “Name” value in your DirectAdmin panel, make sure to add a dot (.) at the very end of your domain name (for example: axspace.com.).
That’s it — copy both Name and Value, go to DNS Management in DirectAdmin, create a new TXT record, paste them, and click Add.
Summery
In this AxSpace Blog post, we covered the key things you need to send emails properly from your site: SPF, DKIM, and DMARC records.
These three records are the foundation of reliable email sending. If even one is missing or set up wrong, your emails have almost no chance of landing in the Inbox , they usually go straight to Spam!
Setting them up isn’t hard at all, but the difference it makes is huge. Your emails reach people more easily, your domain keeps its good reputation, and you look less like spam.
If you get stuck or have any questions, just reach out to AxSpace support, we’ll help you quickly.